
Wednesday, July 25, 2012
Hey...where'd you go?
Sorry for the lack of blogging. We are in the middle of a big move and my creativity has been put on hold! But don't worry, I'll be back shortly! Thanks for checking in!
Friday, July 13, 2012
Mini Fruit Pizzas
I love Pinterest...have I told you that before? I recently pinned and tried these Mini Fruit Pizzas from Pillsbury. They are super easy and make a tasty treat! (Fruit makes anything healthy, right?)

1 (8-oz.) pkg. cream cheese, softened
2 tablespoons frozen limeade concentrate, thawed
1/2 cup powdered sugar
10 fresh strawberries, quartered
1 kiwi fruit, peeled, cut in half lengthwise and cut into 10 slices (optional)
1/2 cup fresh blueberries
1/2 cup fresh raspberries


Here's what you'll need:
1 (18-oz.) pkg. (20 cookies) Pillsbury® Ready to Bake!™ Refrigerated Sugar Cookies1 (8-oz.) pkg. cream cheese, softened
2 tablespoons frozen limeade concentrate, thawed
1/2 cup powdered sugar
10 fresh strawberries, quartered
1 kiwi fruit, peeled, cut in half lengthwise and cut into 10 slices (optional)
1/2 cup fresh blueberries
1/2 cup fresh raspberries
DIRECTIONS
1. Bake cookies as directed on package. Cool 10 minutes or until completely cooled.
2. Meanwhile, in medium bowl, combine cream cheese, limeade concentrate and powdered sugar; beat until smooth.
3. Spread each cooled cookie with 1 tablespoon cream cheese mixture. Arrange fruit on top of each. Serve immediately, or cover and refrigerate up to 2 hours.

Thursday, July 12, 2012
My Favorite Nail Polish
I heart nail polish. Every time I go into a store with a beauty section, I bee-line it towards the nail polish and try on as many colors as I can. (Am I allowed to do that?) I go through seasons of nail polish buying but find myself addicted to the hunt during the summertime. Some of my favorite memories with my mom and sisters are going to the 24-hour super center at midnight and trying on nail polish! (Why? Because we can!) After much consideration, testing, trying and buying, I have decided the best nail polish on the market right now is Sally Hansen's Complete Salon Manicure. In fact, I love this polish so much, I tried to call Sally and tell her. But, the number was unlisted so I'm doing the next best thing: I'm blogging about it!
What is your favorite brand of nail polish? Leave a comment! (You know I'll go straight to the store to try it on!)
 |
| Kook-A-Mango |
This line of nail polish has the best. brush. ever. Hands down. The wide, tapered brush allows the paint to go on smoothly with as little as two swipes, and looks perfect after two coats. Some brands have teeny, tiny, straight-edged brushes that go on streaky, and don't dry evenly. Why mess with that?
 |
| Plum Luck |
Next time you're near the beauty section at your local store, check out Sally Hansen's Complete Salon Manicure line. Test it for yourself!
 |
| Left to right: Petrol, Plum Luck, Wine Not, Right Said Red, Kook-A-Mango, Frutti Petutie, Parchment |
Wednesday, July 11, 2012
Paper Flowers Giveaway!
It's time for my first giveaway! Since we are moving at the end of the month, I decided it would be easier to give away these flowers than to pack them. One lucky person will win a lovely bouquet of paper flowers as featured on last Friday's blog! (Sorry, jar and extra decorations are not included.) All you have to do is leave a comment and tell me what you would do with these paper flowers! It's that simple! The giveaway will end Sunday, July 15 at 11:59 pm CST.


Tuesday, July 10, 2012
Crock-Pot Chicken Tacos
I love ideas. I love electronic hoarding. I love Pinterest. I have over 100 boards and over 5,000 pins. (Should I admit that?) The key to justifying the horrendous amount of boards and pins acquired is to actually test the pins. One of the first recipes I tested was Crock-Pot Chicken Tacos. I tried it because the description said it was only three ingredients. Really? Can it really be that good? Oh girl.
The recipe I pinned was from Chocolate Therapy, and originally from Tasty Kitchen. If you try anything this week, try this recipe. It will change your life!
What you will need:
- 6 chicken breasts--frozen or fresh
- 1 packet of taco seasoning--or make your own if you don't have one on hand. A great recipe over at All Recipes will do the trick! I've used it often and I omit the salt to help cut back on the sodium.
- 1 16 oz. jar of your favorite salsa
Instructions: Put all of the above ingredients into a crock-pot and cook for 4-6 hours, depending on if you're using frozen or fresh chicken. Stir occasionally. It will fall apart and shred easily when it's ready.
I serve the chicken with tortillas, cheese, avocado, black beans, tomato, fresh cilantro and sour cream. Believe me, you will want to make this at least once a month, if not once a week...or more. Just sayin'!
Dig in, friends!


Want to see all 5,000+ pins? Follow me on Pinterest!
www.pinterest.com/tacojulieromero.
Monday, July 9, 2012
Office Transformation
We are moving in a few weeks and I've been madly sorting, purging, packing, fixing, and painting the house to get it ready for it's new owners. As I was packing up my husband's office this weekend, I thought of the surprise office makeover I gave him a few winters ago, while he was out of town for work. As a musician, he had been wishing he had an office to write and practice in, and since the spare bedroom was just collecting junk, I decided to surprise him and turn it into his office/studio! I needed inspiration and found the perfect solution from a book we received for Christmas that year called Junk Beautiful by Sue Whitney & Ki Nassauer.
 These brilliant women redo rooms by using flea market finds--and this book was right up my alley! I found an office makeover in their book that became the inspiration room by which I made over Taco's office. (Yes, my husband's nickname is "Taco".) What I liked about this inspiration room were the colors, the layout, and the use of vintage finds to create a one-of-a-kind office space!
Here are some photos from the inspiration room:

 Here are the before and after photos of Taco's office makeover:

 As you can see, the spare bedroom happened to have a closet perfect for duplicating the desk space similar to the inspiration photo above. I made the desk by taking an old door and adding banquet table legs and plexiglass on top. I inserted photos of Taco's family and friends between the plexiglass and the top of the table. I attached an old, red, retro lamp to the table for added light.
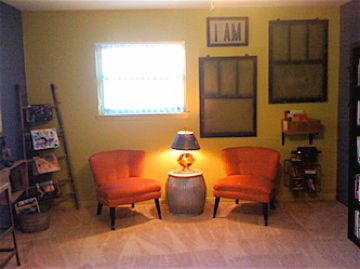
 To the right of the table I hung an old window frame without the glass, and painted a layer of magnetic paint and then chalkboard paint inside.

 I removed the closet doors, put an extra table inside the closet and added old jars to hold change, business cards and receipts. A wire basket contained journals and notebooks.

 When I saw the red chairs in the inspiration photo, I just knew this was the room for Taco! We acquired two, red, retro chairs a few years ago that would look perfect in that space! I turned upside down an old flour barrel to create an impromptu table top. We also just happened to have a few black screens to add to the wall decor. The rest just fell into place!


The result: Taco flipped out when he came home from his trip and immediately put his new office/studio to use!
Recently, Taco recorded his first album and one of the songs was produced in this room. What a great memory to hold on to as we move out and say goodbye to five great years in this house!
A quick photo recap:
For more inspiration from Sue Whitney, visit her website at: www.junkmarketstyle.com
For more information about Taco's album, visit his page on Facebook: Mike Romero Music, or visit www.mikeromeromusic.com (coming soon!)
Here are some photos from the inspiration room:


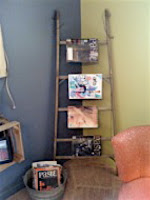
In addition: I added another window pane on the wall between the two windows and painted chalkboard paint inside; hung an old crate from shelf brackets; leaned an old ladder in the corner of the room and hung magazines on the rungs; and put the rest of the magazines in an old bucket on the floor.


Against the spare wall I put our Ikea bookshelf and filled it with Taco's expansive book collection. On top I displayed our collection of old cameras and reel to reel projectors.
The result: Taco flipped out when he came home from his trip and immediately put his new office/studio to use!
Recently, Taco recorded his first album and one of the songs was produced in this room. What a great memory to hold on to as we move out and say goodbye to five great years in this house!
A quick photo recap:
 |
| Clockwise from top: inspiration photo, after, before |
 |
| Clockwise from top: inspiration photo, after, before |
For more information about Taco's album, visit his page on Facebook: Mike Romero Music, or visit www.mikeromeromusic.com (coming soon!)
Friday, July 6, 2012
Paper Flower Tutorial
On a weekend visit to Belton, Texas, my good friend Shaina showed me a vase full of paper flowers she made for her sister's wedding bouquet. It was absolutely amazing! She had it displayed so beautifully next to a vintage typewriter and old door.
 Here's Shaina with her flowers, and a pic of how she and her sister incorporated them into the wedding bouquets. Can you spot the crossword puzzle flower?

 Shaina graciously showed me how to make these flowers and now I will pass this project on to you! The original tutorial is found over at CraftStylish.

1. Gather your materials. You will need:

 2. Punch out a circle from a book page. You may be able to get 2-3 punches per book page.
 3. Fold the circle in half three times.
 4. Trim the edges to create a petal effect. It should look like a teardrop when folded. The deeper the cut the deeper the petals.
 5. Unfold the flower.


 8. Poke the other end of the floral wire into the center of the flower and pull through until the coil sits in the center of the flower.
 9. Hold the coil steady inside the flower with one hand while twisting the wire underneath the flower around a few times to hold the flower on the wire. Be delicate during this process as it is easy to rip the bottom of the flower.
10. Repeat steps 2-9 to create a bouquet. Place in your favorite jar or vase!


1. Gather your materials. You will need:

- Scissors
- Floral wire--Pictured is a package of 26 ga., 18" long floral wire. You can use the wire wrapped around the spool as well--either works fine. The key is to use the thinnest gauge. The thicker wire tends to split the paper when affixing it to the bottom side of the flower.
- Needle nosed pliers
- Wire cutter--(only needed if using floral wire on the spool).
- Double-sided tape or scrapbook stickies
- Old book--make sure the pages don't break when you fold them. You can also use maps or scrapbook paper.
- Circle punch--you don't have to use a punch, but it sure makes it easier! You can use any size. I use a 3" circle punch in the tutorial, but the flowers in the vase are from a 2.5" circle punch. You can easily cut squares to the proper width, then fold them, and cut them in the same way as demonstrated in the tutorial.


6. Tape down one of the petal folds. Tape the back side of the taped petal and fold down the petal again to create a conical flower.

7. Take the tip of the needle nose pliers and twist one end of a length of floral wire into a tight coil. Remove the pliers from the coil.


10. Repeat steps 2-9 to create a bouquet. Place in your favorite jar or vase!


On a side note, if you want a bouquet of paper flowers and don't want to make your own, you can purchase them from my Etsy sight! Click here to purchase paper flowers.
Thursday, July 5, 2012
Master Bath Painting Project of Doom
Five years ago, when we bought our first house, the walls in our master bathroom were a neutral, off-white, blah color. In an effort to surprise me while I was on a trip, my husband and several friends painted the bathroom a barn red color (leftover from a previous project), which, in essence is a great color, but not in our bathroom (my husband agrees). We have no windows and red made the room feel small and overwhelming. Besides that, the paint job was never finished, as you will see in the pictures. When we would shower, the paint would condensate and drip down onto our mustard-colored tub, leaving red watermarks (did I mention our house was built in the 70's?). Awesome.


 Now that it's painted, I get to enjoy it for another three weeks. Why does it take moving to get my house just the way I always wanted it? Lesson learned.
Several months ago I decided to rid our bathroom of this monstrosity and gathered as many paint chips as I could get. The idea was to paint the walls a light blue/grey. I figured since the color of my tub was now in style, it would be easy to match it up with a great wall color and bring our bathroom into the current century. In order to get just the right color I had to first find a paint chip that matched the mustard-colored tub and toilet, and another to match the gold-flecked, off-white, slightly discolored sink (did I mention our house was built in the 70's?). Once I matched those colors correctly, I proceeded to find the perfect blue/grey: Valspar's Pelican. Awesome! Except, by the time I'd made several trips to the home improvement store and back with paint chips and supplies, I was unmotivated to paint.
Fast-forward 10 months (10 months?) when we decided to sell our house and I had to face the inevitable. Whether I was motivated or not, it was time to paint the bathroom. Mustering strength, courage and the forgotten paint supplies, I set out to paint the bathroom of doom. But, there was a problem. Turns out, the red paint was oil based and the primer I bought was not. The frustration! The horror! I took me 5 days to finish this bathroom because of the emotional ridiculousness it caused. But it's done.
Take a look at the before and after. Pictures include the vanity area outside the bathroom that was NOT painted barn red, thank you very much!


Subscribe to:
Posts (Atom)