We are moving in a few weeks and I've been madly sorting, purging, packing, fixing, and painting the house to get it ready for it's new owners. As I was packing up my husband's office this weekend, I thought of the surprise office makeover I gave him a few winters ago, while he was out of town for work. As a musician, he had been wishing he had an office to write and practice in, and since the spare bedroom was just collecting junk, I decided to surprise him and turn it into his office/studio! I needed inspiration and found the perfect solution from a book we received for Christmas that year called Junk Beautiful by Sue Whitney & Ki Nassauer.
These brilliant women redo rooms by using flea market finds--and this book was right up my alley! I found an office makeover in their book that became the inspiration room by which I made over Taco's office. (Yes, my husband's nickname is "Taco".) What I liked about this inspiration room were the colors, the layout, and the use of vintage finds to create a one-of-a-kind office space!
Here are some photos from the inspiration room:
Here are the before and after photos of Taco's office makeover:
As you can see, the spare bedroom happened to have a closet perfect for duplicating the desk space similar to the inspiration photo above. I made the desk by taking an old door and adding banquet table legs and plexiglass on top. I inserted photos of Taco's family and friends between the plexiglass and the top of the table. I attached an old, red, retro lamp to the table for added light.
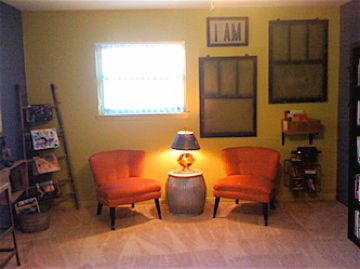
To the right of the table I hung an old window frame without the glass, and painted a layer of magnetic paint and then chalkboard paint inside.
I removed the closet doors, put an extra table inside the closet and added old jars to hold change, business cards and receipts. A wire basket contained journals and notebooks.
When I saw the red chairs in the inspiration photo, I just knew this was the room for Taco! We acquired two, red, retro chairs a few years ago that would look perfect in that space! I turned upside down an old flour barrel to create an impromptu table top. We also just happened to have a few black screens to add to the wall decor. The rest just fell into place!
In addition: I added another window pane on the wall between the two windows and painted chalkboard paint inside; hung an old crate from shelf brackets; leaned an old ladder in the corner of the room and hung magazines on the rungs; and put the rest of the magazines in an old bucket on the floor.
Against the spare wall I put our Ikea bookshelf and filled it with Taco's expansive book collection. On top I displayed our collection of old cameras and reel to reel projectors.
The result: Taco flipped out when he came home from his trip and immediately put his new office/studio to use!
Recently, Taco recorded his first album and one of the songs was produced in this room. What a great memory to hold on to as we move out and say goodbye to five great years in this house!
A quick photo recap:
 |
| Clockwise from top: inspiration photo, after, before |
 |
| Clockwise from top: inspiration photo, after, before |
For more inspiration from Sue Whitney, visit her website at: www.junkmarketstyle.com
For more information about Taco's album, visit his page on Facebook: Mike Romero Music, or visit www.mikeromeromusic.com (coming soon!)


Love!
ReplyDeleteI had no idea there is such a thing as magnetic paint. Totally gives me an idea. You just paint that and then chalkboard paint over it?
I sure did! I painted about 2-3 layers of magnetic paint and checked the magnetic ability after each coat dried. That's why I painted so many layers. I found the stronger the magnet, the better it would stay on the wall. The weaker, cheaper magnets didn't hold items up too well. I then painted 2 coats of chalkboard paint. What I didn't test was to see if the magnetic paint could act as chalkboard paint.... Let me know how your project goes! I'd love to see pictures!
DeleteGood to know! Hope to get around to my project sooner rather than later :)
ReplyDeleteoops ... meant to reply as this blog ... but I"m the same person :p
ReplyDeleteGreat job! Your husband is one lucky lad. Thanks for sharing some tips and ideas that will surely be helpful to those who are looking for ways to transform their office rentals to a more work-conducive place.
ReplyDeleteCheers to those wonderful photos! :) And kudos for transforming another terrific office space!
ReplyDelete